
【完全版】遅延ゼロ・誤作動なし。Android用「汎用物理トリガーボタン」をゼロから自作するプロ向けガイド
This article provides a complete construction guide for a "universal physical trigger button," born out of sheer necessity on the job for food delivery riders frustrated by malfunctioning touchscreens in the rain or delayed wake-up times, or for geeks looking to maximize the efficiency of their Android device operations.
X post at time of creation 1 X post at time of creation 2 X post at time of creation 3 X post at time of creation 4 X post at time of creation 5
1. Concept: Why I Went the "DIY" Route
While this guide focuses on practical hardware and software construction procedures, the process of repeated failures and trial-and-error on rain-soaked roads that led to the birth of this "ultimate physical button" is recorded in the note article below. If you are interested in the gritty story of why existing products weren't enough and the path to development, please take a look.
- Reference Article (note): 【Smart Remote】The story of building the ultimate physical button to make delivery on rainy days comfortable

Cheap commercially available Bluetooth buttons and media controllers have fatal weaknesses in the harsh, professional-level environments (rain, continuous operation, operations requiring split-second judgment).
-
Sleep Wake-up Delay: Due to power-saving features, the first click is often not recognized when you really need to press it.
-
Layout Interference: In certain apps (like Uber Eats), the input signals of off-the-shelf products can trigger unexpected behavior.
-
Chattering and Water Damage: Low physical airtightness leads to frequent malfunctions (chattering) caused by high humidity or water droplets on rainy days.
To solve these problems from the ground up, this project takes the approach of using an Arduino-compatible microcontroller to create custom firmware in C++, allowing the OS to recognize it as a "media remote with optimal behavior." This creates a seamless, lag-free, and reliable operating environment.
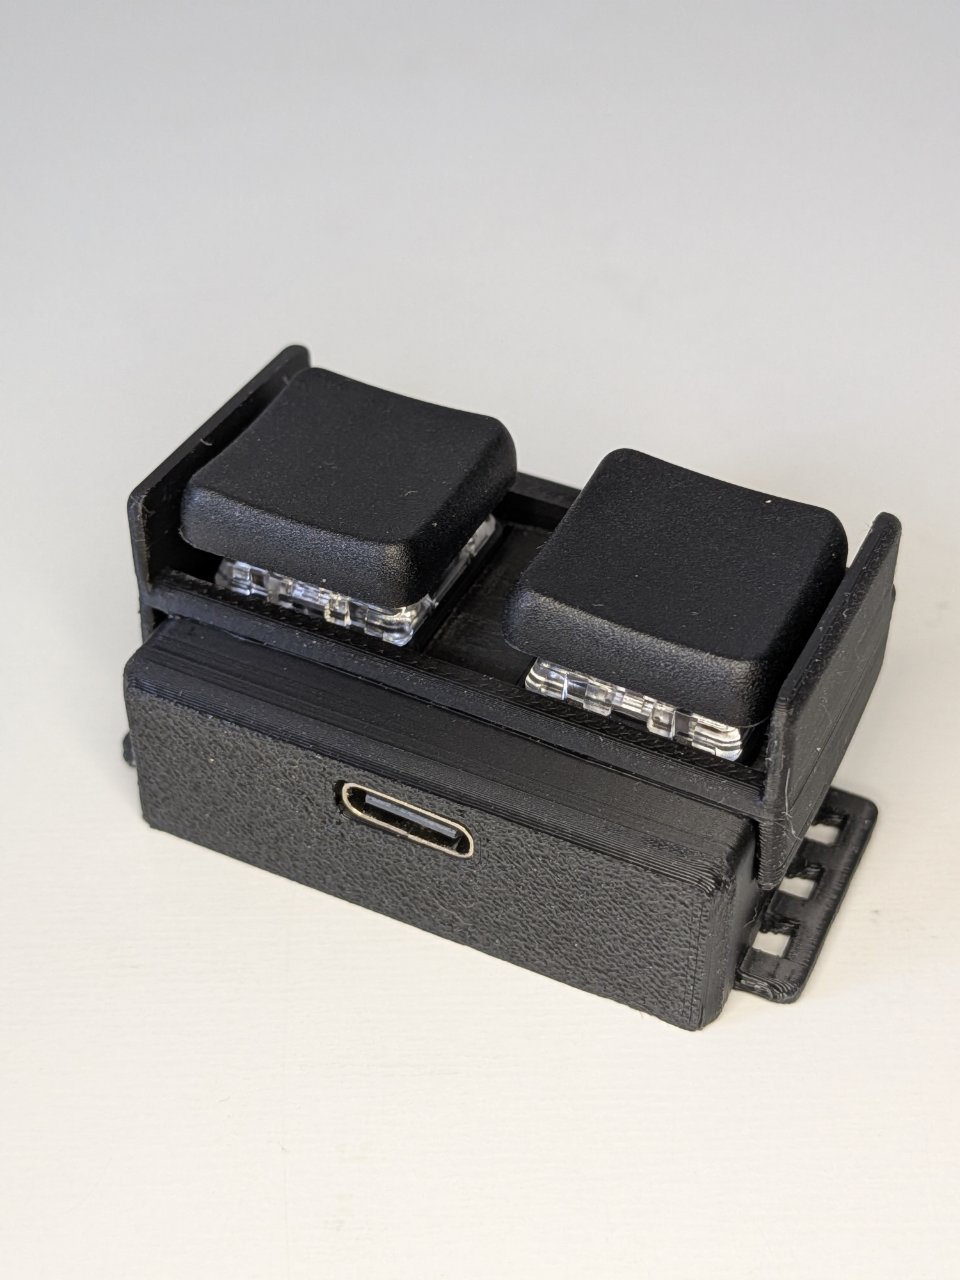
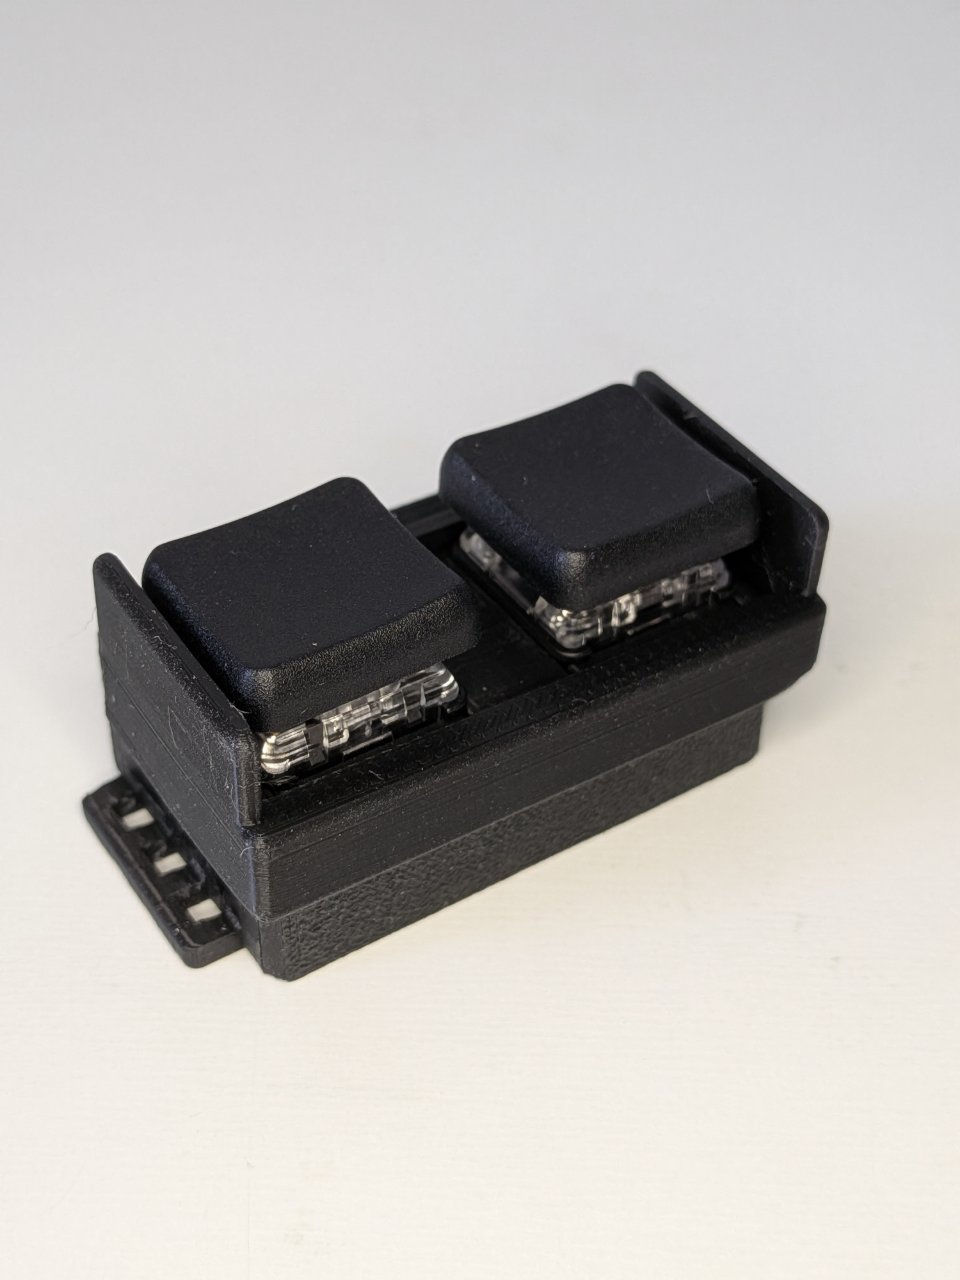
2. Required Parts (BOM: Bill of Materials)
This is a list of parts proven in field testing, all available at electronics specialty stores in Akihabara or on Amazon. The selections focus on stability.
| Part Name | Model / Details | Approx. Lowest Price (incl. tax) | Source | Reason for Selection |
|---|---|---|---|---|
| Microcontroller Board | Seeed Studio XIAO nRF52840 | 1,800 JPY | Sengoku Densho | Ultra-small, Bluetooth 5.0 compatible, built-in battery charge/discharge circuit. The optimal choice for this purpose. Amazon |
| Battery | Li-po Battery 3.7v 110mAh | 880 JPY | Sengoku Densho | Fits the size of the XIAO while ensuring sufficient operating time. Amazon |
| Key Switch | Kailh Choc Brown | 60 JPY/pc | Yusha Kobo | Low-profile with a distinct tactile click. Prevents accidental input. Yusha Kobo |
| Keycap | chocfox CFX 1U keycap | 550 JPY/10pcs | Yusha Kobo | Dedicated for Choc switches. Flat and easy to press. Yusha Kobo |
| Wiring | Inner wire from a spare USB cable, etc. | 0 JPY | Scraps | Thin, flexible, and easy to route in extremely small spaces. |
| Case | 3D printed, etc. | - | DIY | You can make it with a 100-yen store container. I created mine using a 3D printer. |
3. Required Tools and Consumables
Since this is precision work, preparing the proper tools is the key to success.
-
Soldering Iron: A temperature-controlled model is recommended. A tip that is not too thin provides better thermal conductivity.
-
Solder:
goot High-Density Mounting SD-81 (0.6mm)\ Amazon -
Fixing Tool:
Support Stand Flexible Arm Type\ Amazon -
Adhesive Gel Double-Sided Tape:
Can Do brand (1.8mm thickness). ※ I designed the dimensions of the 3D-printed case around this 1.8mm thickness, so if you are creating a custom case, you may not need it, or should use a different method to secure the board and battery.
4. Hardware Implementation: The Secrets to Reliable Assembly
Mistakes in this step lead directly to malfunctions. Please be extremely careful with the basics of soldering and handling the battery.
4-1. Preparing the Wiring
Strip the outer sheath of a discarded charging cable (like a USB cable) and extract the ultra-fine conductive wires (core wires) inside. Cut them to the required length, strip about 2–3mm of insulation from both ends, and pre-apply a small amount of solder (pre-tinning).
4-2. Soldering the Switch and Board
Connect the XIAO nRF52840 to the key switch.
-
Connections:
-
Button 1 (Main Button): Connect one pin of the key switch to the
D0pin of the XIAO, and the other to theGNDpin. -
Button 2 (Sub Button): Connect one pin of the key switch to the
D1pin of the XIAO, and the other to theGNDpin.(※ Since GND is common, you can daisy-chain it on the switch side.)
-
-
Soldering Tip (Preheating):
Most failures to get solder to stick are due to "insufficient heat." Apply the soldering iron tip to both the board pad (metal part) and the wire simultaneously, preheat for 1–2 seconds, and then feed the solder. Success is when the solder spreads smoothly into a mountain shape. If it forms a round bead, it is likely due to insufficient heat or lack of flux.
4-3. Connecting the Battery (Warning: Danger of Short Circuit)
The battery is soldered directly to the battery connection pads (BAT+ and BAT-) on the back of the board.
-
Never Short Circuit: When cutting Li-po battery wires, never cut the positive and negative wires simultaneously with nippers. The blades will cause a short circuit, creating a fire hazard. Always cut them one at a time and insulate the other with tape until you are ready to work on it.
-
Connection Steps: For safety, solder the negative (black wire) to
BAT-on the board first, and then solder the positive (red wire) toBAT+.
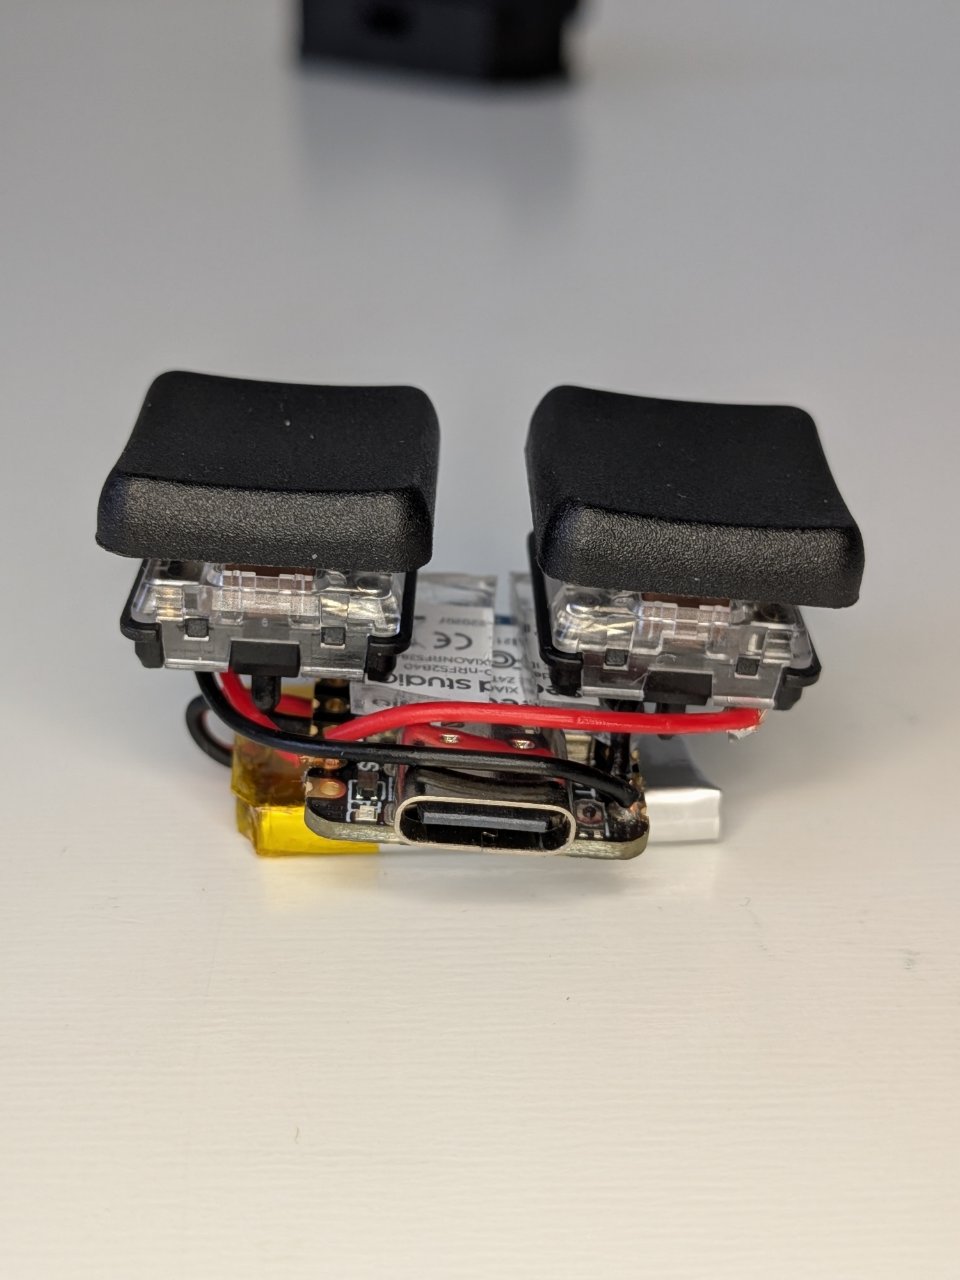
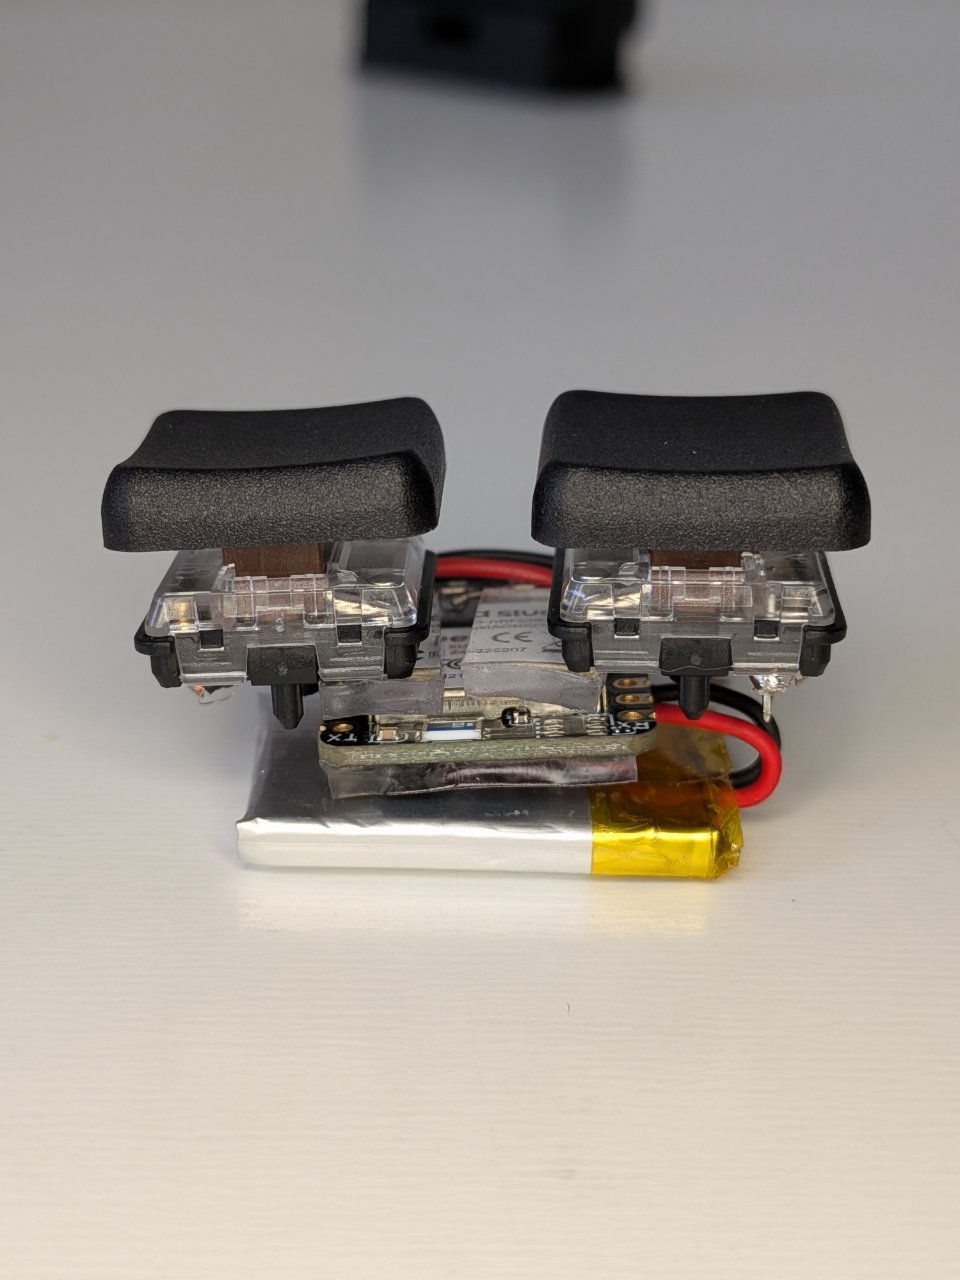
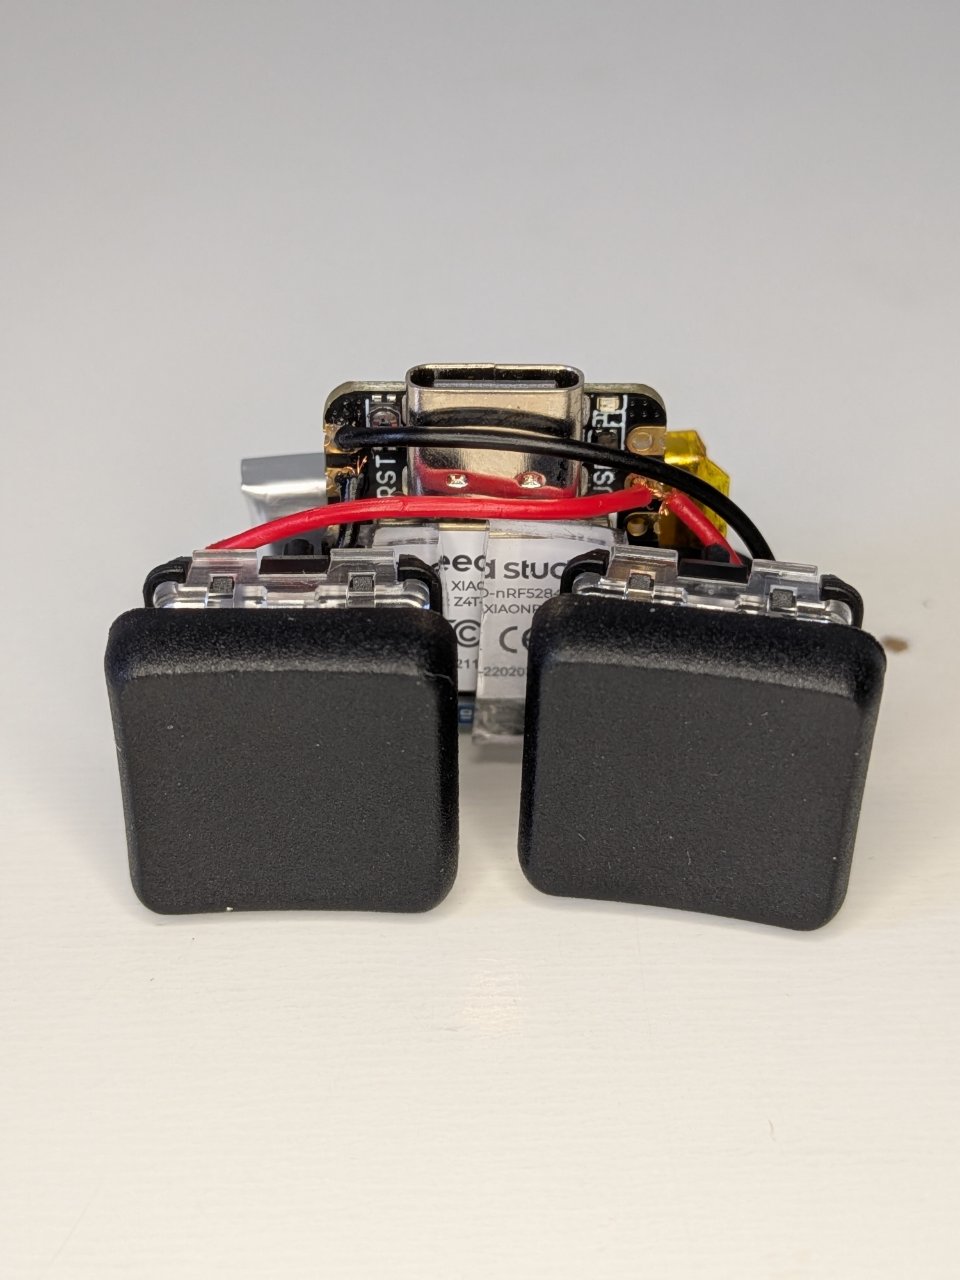
4-4. Installation and Fixing (Measures to Prevent Disconnection)
In micro-scale electronics, the most common trouble is "disconnection at the base of the wire."
Once soldering is complete, do not move the board or wires unnecessarily.
To prevent disconnections, immediately after soldering, use the prepared 1.8mm thick gel double-sided tape to integrate and firmly secure the board, battery, and key switch inside the 3D-printed case. The thickness and elasticity of this tape provide both shock absorption and optimal component placement.
*※ The 1.8mm gel double-sided tape is specifically for fitting into the case I created; if you are building in a custom environment, you can use a different method. *※ I recommend fixing with tape immediately because moving the components for the next soldering step can easily lead to wire breakage.
5. Software: Firmware Flashing
We will inject the "brain" into the microcontroller to make it function as a high-performance Bluetooth button.
5-1. Arduino IDE Setup and Flashing
Install the Arduino IDE from https://www.arduino.cc/en/software on your PC and add the necessary board package (Seeed nRF52 mbed-enabled Boards).
Launch the installed IDE and connect the Seeed Studio XIAO nRF52840 to your PC via a USB cable.
-
Board Search: Open
Select Other Board and Portfrom the menu, search forSeeed Studio XIAO nRF52840, and select it.(※ Note: There are other boards with similar names like the "Plain (SAMD21)" or "ESP32C3" in the Seeed Studio XIAO series. Make sure to specify "nRF52840." You cannot flash it if you choose the wrong one.)
Board Selection: When you search,
Seeed Studio XIAO nRF52840will appear; select it. Be careful, as there are different versions like Plus, Seeed, etc.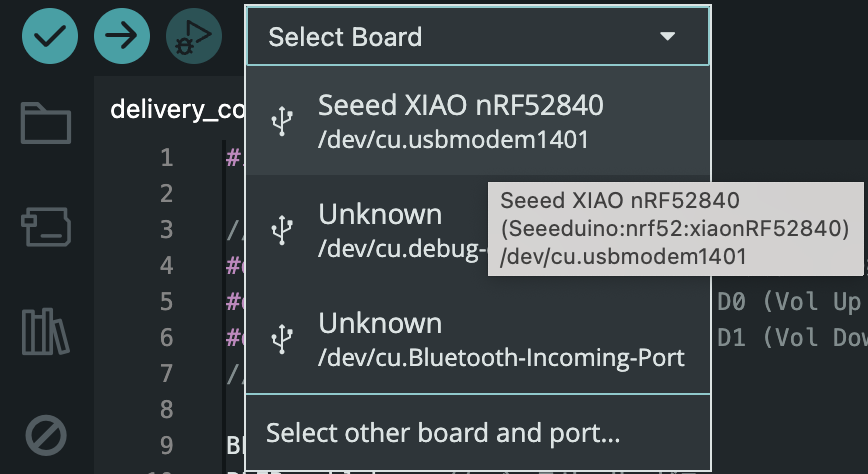
-
Port Selection:
From
Tools->Port, select the port (e.g., COM port) to which theSeeed Studio XIAO nRF52840is connected. ※ On Mac, tools are in the taskbar, not in the window.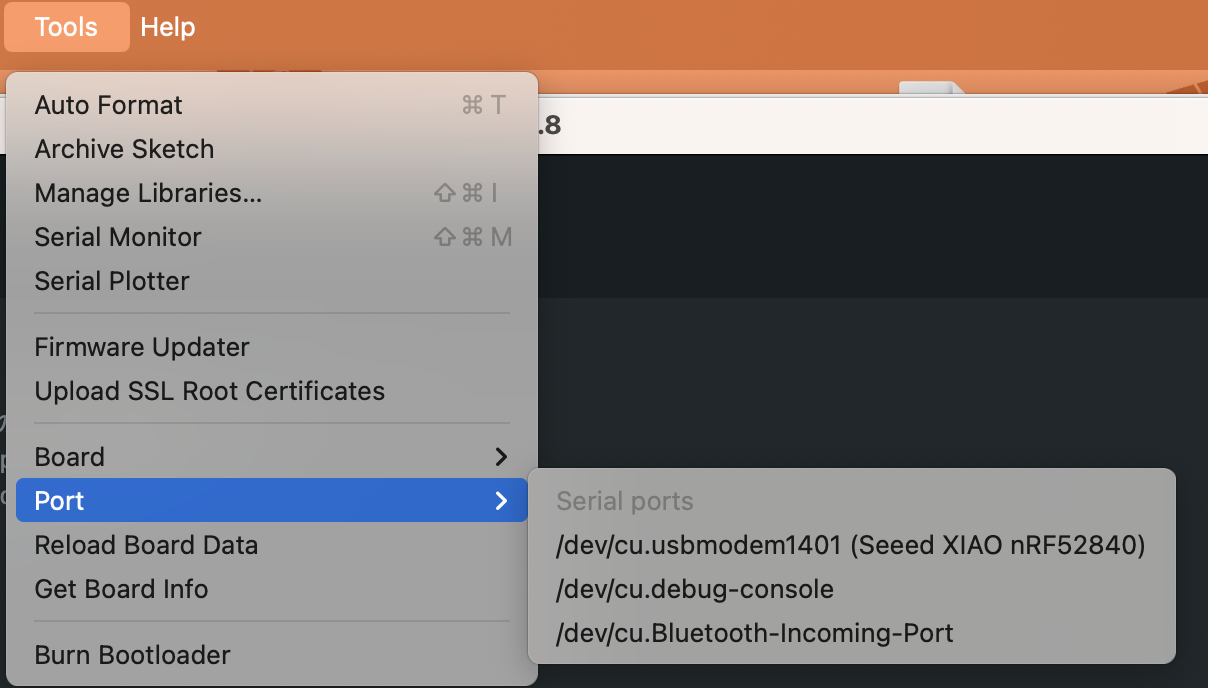
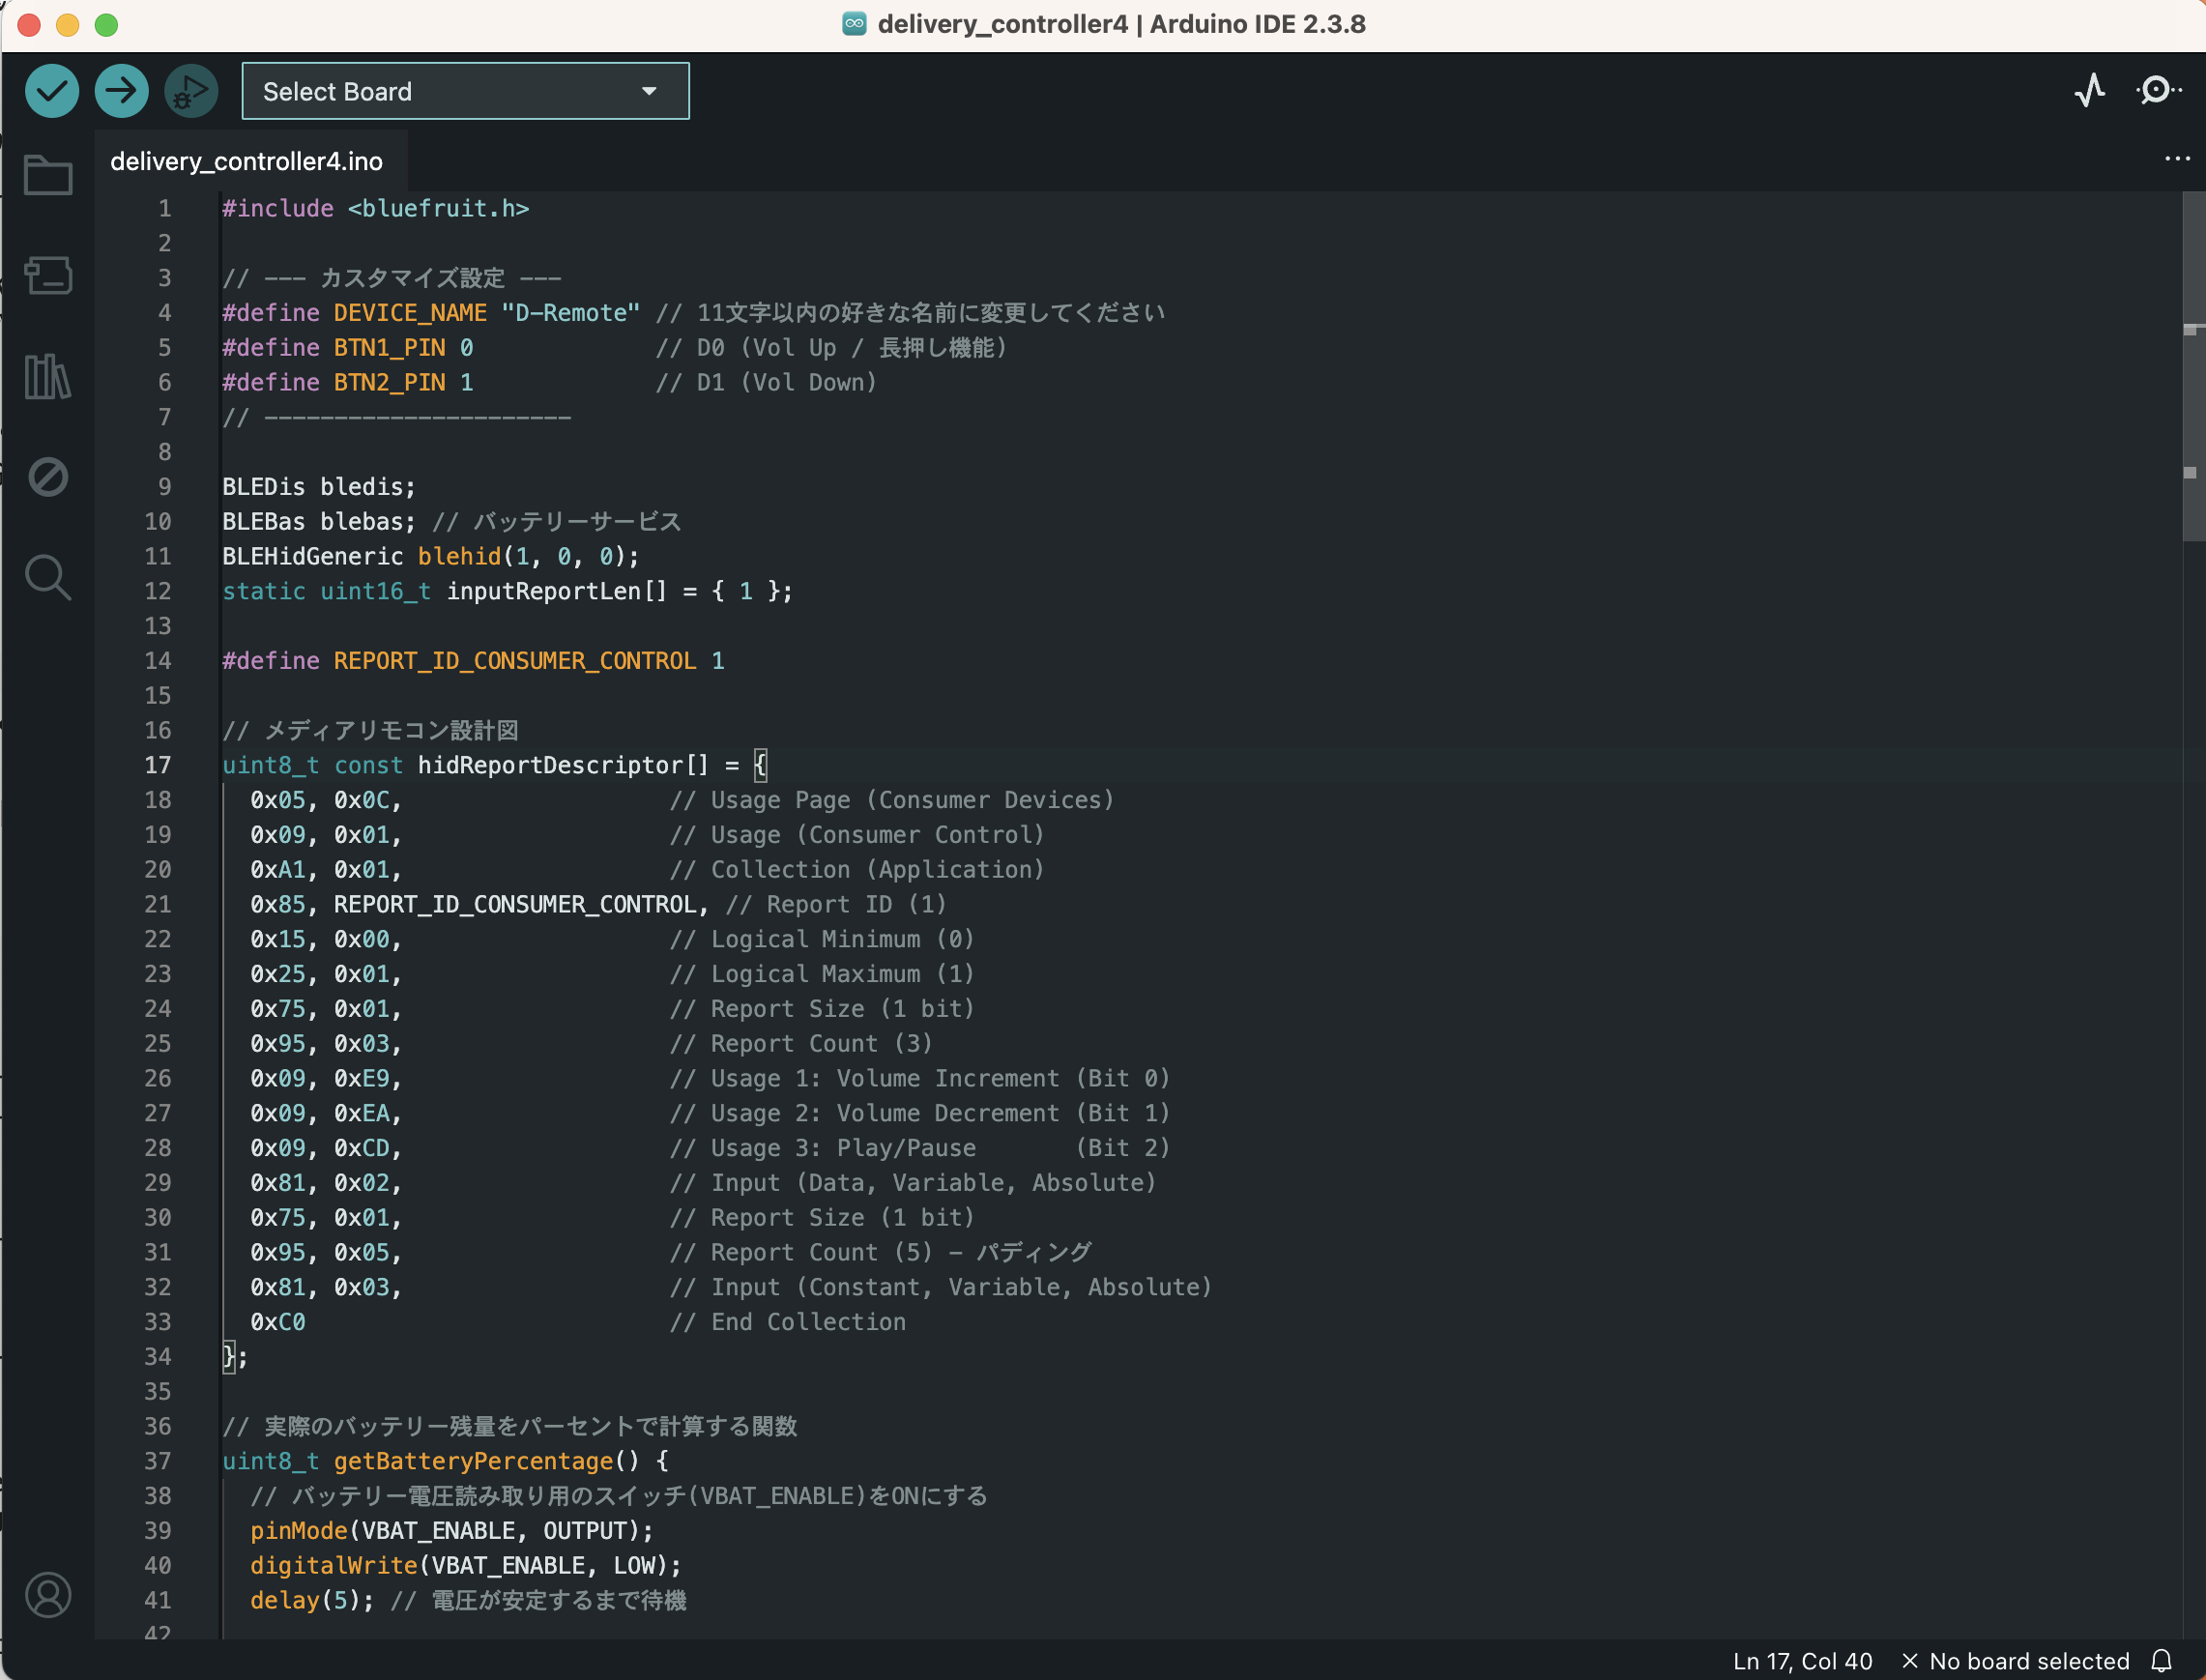
Flashing: Once the board and port are ready, paste the following into the text input area in the center.
#include <bluefruit.h>

// --- Custom Settings ---
#define DEVICE_NAME "D-Remote" // Change to your preferred name, max 11 characters
#define BTN1_PIN 0             // D0 (Vol Up / Long press function)
#define BTN2_PIN 1             // D1 (Vol Down)
// ----------------------

BLEDis bledis;
BLEBas blebas; // Battery Service
BLEHidGeneric blehid(1, 0, 0);

static uint16_t inputReportLen[] = { 1 };
#define REPORT_ID_CONSUMER_CONTROL 1

// Media Remote Blueprint
uint8_t const hidReportDescriptor[] = {
  0x05, 0x0C,                   // Usage Page (Consumer Devices)
  0x09, 0x01,                   // Usage (Consumer Control)
  0xA1, 0x01,                   // Collection (Application)
  0x85, REPORT_ID_CONSUMER_CONTROL, // Report ID (1)
  0x15, 0x00,                   // Logical Minimum (0)
  0x25, 0x01,                   // Logical Maximum (1)
  0x75, 0x01,                   // Report Size (1 bit)
  0x95, 0x03,                   // Report Count (3)
  0x09, 0xE9,                   // Usage 1: Volume Increment (Bit 0)
  0x09, 0xEA,                   // Usage 2: Volume Decrement (Bit 1)
  0x09, 0xCD,                   // Usage 3: Play/Pause       (Bit 2)
  0x81, 0x02,                   // Input (Data, Variable, Absolute)
  0x75, 0x01,                   // Report Size (1 bit)
  0x95, 0x05,                   // Report Count (5) - Padding
  0x81, 0x03,                   // Input (Constant, Variable, Absolute)
  0xC0                          // End Collection
};

// Function to calculate actual battery percentage
uint8_t getBatteryPercentage() {
  pinMode(VBAT_ENABLE, OUTPUT);
  digitalWrite(VBAT_ENABLE, LOW);
  delay(5);

  analogReference(AR_INTERNAL);
  analogReadResolution(12);
  int raw = analogRead(PIN_VBAT);

  digitalWrite(VBAT_ENABLE, HIGH);
  pinMode(VBAT_ENABLE, INPUT);

  float mv = raw * (3600.0 / 4096.0) * (1510.0 / 510.0);

  if (mv >= 4200.0) return 100;
  if (mv <= 3300.0) return 0;
  return (uint8_t)((mv - 3300.0) / (4200.0 - 3300.0) * 100.0);
}

void setup() {
  pinMode(BTN1_PIN, INPUT_PULLUP);
  pinMode(BTN2_PIN, INPUT_PULLUP);

  Bluefruit.begin();
  Bluefruit.setTxPower(8);
  Bluefruit.setName(DEVICE_NAME);
  Bluefruit.setAppearance(BLE_APPEARANCE_HID_GAMEPAD);

  bledis.setManufacturer("HI-JA");
  bledis.setModel("Delivery Controller");
  bledis.begin();

  blebas.begin();
  blebas.write(getBatteryPercentage());

  blehid.setReportLen(inputReportLen);
  blehid.setReportMap(hidReportDescriptor, sizeof(hidReportDescriptor));
  blehid.begin();

  Bluefruit.Advertising.addFlags(BLE_GAP_ADV_FLAGS_LE_ONLY_GENERAL_DISC_MODE);
  Bluefruit.Advertising.addTxPower();
  Bluefruit.Advertising.addAppearance(BLE_APPEARANCE_HID_GAMEPAD);
  Bluefruit.Advertising.addService(blehid);
  Bluefruit.Advertising.addService(blebas);
  Bluefruit.Advertising.addName();
  Bluefruit.Advertising.restartOnDisconnect(true);
  Bluefruit.Advertising.setInterval(32, 244);
  Bluefruit.Advertising.setFastTimeout(30);
  Bluefruit.Advertising.start(0);
}

void loop() {
  bool raw1 = (digitalRead(BTN1_PIN) == LOW);
  bool raw2 = (digitalRead(BTN2_PIN) == LOW);

  static int state = 0;
  static unsigned long pressTime = 0;
  static uint8_t lastReport = 0;
  uint8_t newReport = 0;
  unsigned long now = millis();

  // --- Simultaneous Press Logic ---
  if (state == 0) {
    if (raw1 || raw2) {
      state = 1;
      pressTime = now;
    }
  } else if (state == 1) {
    if (!raw1 && !raw2) {
      state = 0;
    } else if (now - pressTime > 40) {
      if (raw1 && raw2) state = 4;
      else if (raw1) state = 2;
      else if (raw2) state = 3;
    }
  } else {
    if (state == 2 && !raw1) state = 0;
    if (state == 3 && !raw2) state = 0;
    if (state == 4 && (!raw1 && !raw2)) state = 0;
  }

  if (state == 2) newReport = 0x01;
  else if (state == 3) newReport = 0x02;
  else if (state == 4) newReport = 0x04;
  else newReport = 0x00;

  if (newReport != lastReport) {
    blehid.inputReport(0, &newReport, 1);
    lastReport = newReport;
  }

  // --- Long Press Functions ---
  static unsigned long d0StartTime = 0;
  static bool d0Long10s = false;
  static bool d0Long15s = false;

  if (state == 2 && raw1) {
    if (d0StartTime == 0) d0StartTime = now;
    unsigned long duration = now - d0StartTime;

    if (duration >= 15000 && !d0Long15s) {
      d0Long15s = true;
      uint8_t releaseReport = 0;
      blehid.inputReport(0, &releaseReport, 1);
      delay(100);
      nrf_gpio_cfg_sense_input(g_ADigitalPinMap[BTN1_PIN], NRF_GPIO_PIN_PULLUP, NRF_GPIO_PIN_SENSE_LOW);
      NRF_POWER->SYSTEMOFF = 1;
    }
    else if (duration >= 10000 && !d0Long10s && !d0Long15s) {
      d0Long10s = true;
      NVIC_SystemReset();
    }
  } else {
    d0StartTime = 0;
    d0Long10s = false;
    d0Long15s = false;
  }

  static unsigned long lastBatteryTime = 0;
  if (now - lastBatteryTime > 60000) {
    lastBatteryTime = now;
    blebas.write(getBatteryPercentage());
  }
  delay(5);
}
-
Once pasted, execute the flash by clicking the (right arrow icon) in the top left.
A
#gauge display will start; once it finishes, it is safe to disconnect. Do not disconnect while flashing is in progress.If a flashing error occurs, there may be a configuration or pasting issue. Try copying the error code and asking Gemini or ChatGPT about it.
5-2. Troubleshooting: If the Port is Not Recognized or it Freezes
During development, it is common for the board to stop being recognized by your PC (the port does not appear).
-
Basic Reset: Quickly short the "RST" pad on the board twice (double-click) with tweezers, etc. This puts it into bootloader mode and it is often recognized.
-
Last Resort (Total Freeze): If there is no response at all even after resetting, the board may be completely frozen. In this case, a reset button will not work. You may have to resort to the "gritty" method of leaving it connected to the battery and waiting until it completely discharges to force a restart.
5-3. Button Behaviors and Specifications
The code being flashed implements a 40ms state machine, eliminating chattering (malfunctions). It also controls the voltage reading function (VBAT_ENABLE) to send accurate battery levels to your smartphone.
【Button Action Specs】
-
Button 0 (D0) Short Press: Volume Up
-
Button 1 (D1) Short Press: Volume Down
-
Button 0 + Button 1 Simultaneous Press: Play / Pause
-
Button 0 Long Press (10s): Clear Bluetooth pairing info (Reset)
-
Button 0 Long Press (15s): Power Off
【Battery Life】
In standby mode without operation, it lasts about 20–30 days. In real-world environments like frequent delivery work, it will be shorter depending on the number of operations.
Once flashing is complete and it starts operating, the board's blue LED lamp will blink, indicating it is in pairing standby mode.
6. Android Configuration: Turning a Simple Button into the Ultimate Trigger
Once the hardware is complete and paired with your smartphone via Bluetooth, you need to hook this input on the Android OS side and convert it into the desired action. If you don't do this, it will just be a button that changes the volume.
6-1. Preparation: Enabling Developer Options
To use advanced Android system permissions, first enable developer mode.
-
Open Android
Settings>About Phone. -
Tap
Build Number7 times in a row to enable developer mode. -
Open
Settings>System>Developer Optionsand turn on "USB Debugging" and "Wireless Debugging".
6-2. FRep2 Introduction and Macro Creation (Image Recognition Tap)
If you want to use advanced macros like "only tap when a specific button (image) appears on the screen" instead of Key Mapper's fixed-position tap, you must complete the macro in FRep2 before setting up Key Mapper.
(※ If you just want to tap a fixed location directly, you can skip this step and go to "6-3. Shizuku Introduction.")
① Installing FRep2 and Switching to "Precision Mode" (Required)
To perform hard taps via image search in FRep2, you must switch from the default "Simple Mode" to "Precision Mode" and grant screen capture permissions.
-
Install "FRep2" from the Play Store.
-
Access the setup guide on the official FRep2 website (https://strai.x0.com/frep2-ja/setup).
-
Download the [Screen Capture Permission Tool] from the page that matches your work environment (Windows / Mac / Linux / Android standalone) under [Precision Mode Setup / Grant Screen Capture Permission].
-
Run the tool according to the instructions on the website (※ this uses "USB debugging" or "wireless debugging"), grant permissions, and run the service in Precision Mode.
② Preparation (Target Screenshots)
Open the app you want to operate (e.g., Uber Eats) and save a screenshot of the screen containing the button you want to tap.
(※ Image recognition tap will not work for apps where screenshots are blocked for security reasons.)
③ Creating a New Macro and Display Settings
-
Launch FRep2, and from the main screen, tap
Record>New. -
Open [Display Settings] from the options on the right, and change
Display in all appstoWarehouse (No Display).(※ You don't need to display the operation panel as you will be triggering it via shortcuts.)
④ Image Recognition Programming
-
Tap
Edit Playbackin the [Program] menu. -
Press the
+button on the screen, and tapImage Recognition>From Image File.(※ If you cannot select an image here, open FRep2 from Android "Settings" > "Apps" and grant file access permissions.)
-
Open the screenshot image you prepared in advance, and press
Applyat the bottom right.
⑤ Specifying the Recognition Target Frame
-
You will see a screen with a blue square frame. This is the "target to recognize."
-
Align the center of the blue frame with the place you want to tap (e.g., the center of the "X" mark to decline an Uber Eats order).
-
Important: The smaller the recognition frame, the faster the processing. If it's a decline button, a thin horizontal shape around the center of the X mark is fine. Once specified, press
Applyat the bottom right.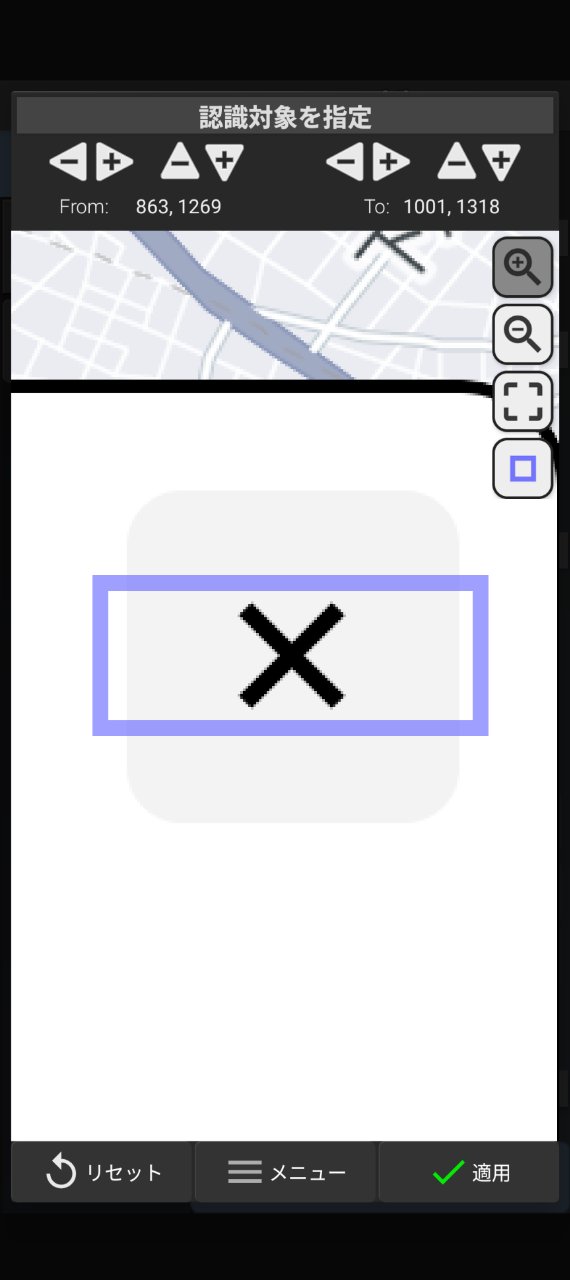
⑥ Recognition Settings and Search Area Optimization (Key to Speed)
-
In the [Recognition Settings] on the next screen, tap
Color Similarity, and change it toSearch: Similarity. -
Check
Tap center of recognition area. -
Tap
Search Area: Full Screen; a diagram with four boxes for numbers will appear. -
Tap the "Image Display" icon (the one that looks like a finger pointing at a photo) in the top right.
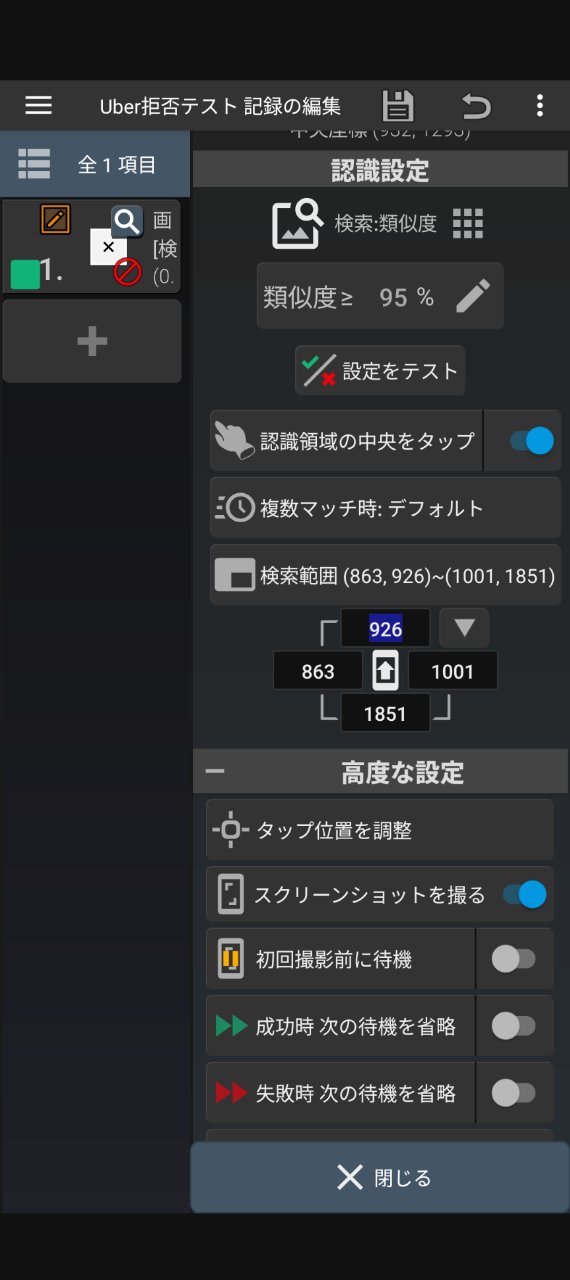
The numerical values for images vary depending on screen resolution, so do not use them as a reference; always adjust the size on your specific device.
-
Only the target part you set with the blue frame will be highlighted.
For buttons like the Uber Eats decline button, where the vertical position changes based on popups, widen the highlighted area to match the maximum fluctuation range.
(※ Again, the smaller the search area, the faster the processing. Keep it to the minimum necessary.)
-
Press
Applyto save. -
Uncheck screenshot saving in [Advanced Settings] if it's not needed.
-
Press
Closein the bottom right to finish the image search settings. -
You can delete the "Wait 5.0" that is there from the beginning of the edit screen as it is unnecessary wasted time.
⑦ Saving and Confirming Settings
-
Tap the "Floppy Disk Icon" in the top right of the screen to save the settings.
-
Tap
Recordfrom the back arrow (or burger menu) in the top left to return to the setting list. -
Tap
Standard Panelin the top bar and change it toWarehouse.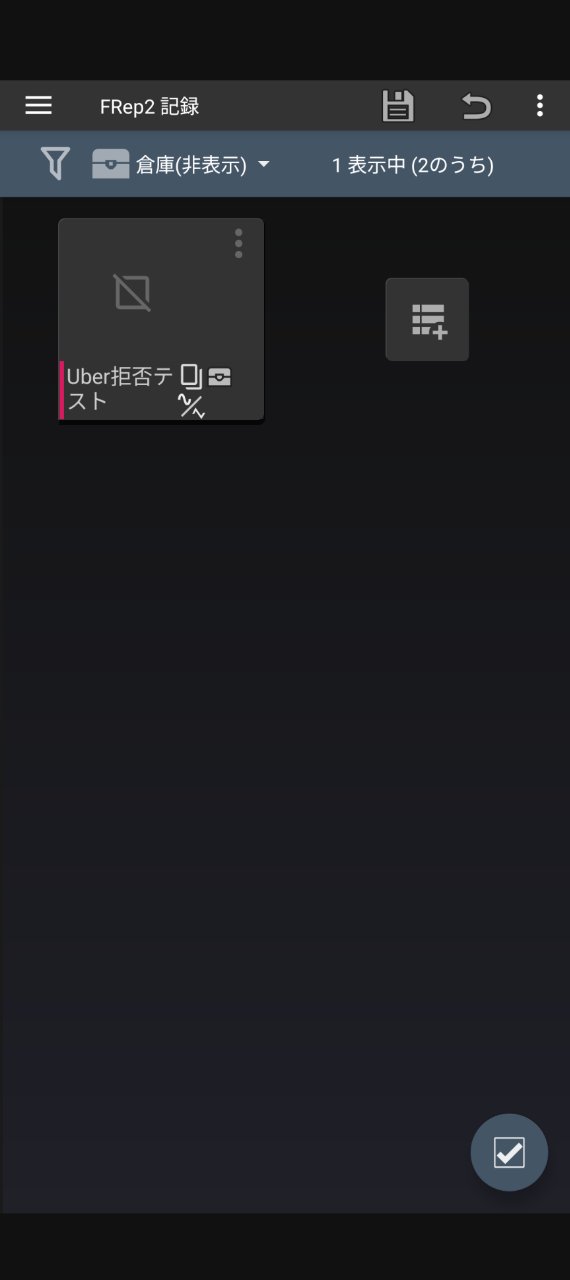
-
If the macro you created is displayed, preparation for FRep2 is complete.
6-3. Shizuku Introduction and Startup (Ensuring System Permissions and Better Response)
To enable system operations that usually require root access (like ADB-based hard screen taps), we keep Shizuku resident.
(※ If using FRep2's image recognition tap, it works without Shizuku, but we strongly recommend it because the response is significantly faster under the Shizuku environment.)
-
Install "Shizuku" from the Google Play Store.
(※ Note: Depending on your device, country, or region (e.g., Pixel 9a in Japan), Shizuku may not appear in the Play Store. In that case, for security, make sure to download the latest APK file directly from the official GitHub release page https://github.com/RikkaApps/Shizuku/releases. Downloading from unknown third-party sites is not recommended.)
-
Communication Environment Preparation (Important): Since Shizuku uses "wireless debugging" for startup, an environment where you can connect to Wi-Fi or tether from another smartphone is mandatory. Please connect to Wi-Fi or tethering at this time.
(※ Rest assured. This connection is only to start Shizuku. You can disconnect after startup is successful. It will not continue to consume data from the tethering device's plan.)
-
Check Developer Options: Just to be sure, confirm that
Settings>System>Developer Optionsis visible and "Wireless debugging" is ON. (If developer options are not visible, tapSettings>About Phone>Build Number7 times as mentioned before.) -
Launch the Shizuku app and tap
Pairingin the "Start via wireless debugging" section. -
It will transition to the wireless debugging screen in developer options; tap
Pair device with pairing code. -
Enter the 6-digit code displayed into the Shizuku notification (or popup).
-
Return to the Shizuku app and tap
Start. If "Shizuku is running" is displayed at the top, it is a success. After confirming it has started, you can disconnect Wi-Fi or tethering. (※ If you reboot the device, you may need to repeat this startup procedure.)
6-4. Key Mapper Settings (Remapping Inputs and Assigning Actions)
This is the core setting that detects physical button inputs and converts them into arbitrary actions. Finally, we link all the movements here.
※ To perform these settings, you need to actually press the keys to record the signals, so please pair your DIY Bluetooth button with your smartphone in advance.
-
Install "Key Mapper" from the Play Store and launch it.
-
On first launch, follow the on-screen instructions to grant accessibility permissions, and also permit Shizuku permissions.
-
Tap the
+button at the bottom of the screen (or+ new key map) to open the rule creation screen withTriggerandActionslined up. -
Recording the Trigger (The Start Action):
-
Tap the red
tap to record trigger(orRecord Trigger) at the bottom of the screen. -
While the screen says "Press your keys," press "Button 1 (e.g., Volume Up)" on your DIY physical button.
-
If the Bluetooth device name and the signal like "Volume Up" are recorded on the screen, you are successful.
(※ Point: The signal sent is "Volume Up," but by going through Key Mapper, you can convert it to a different action you specify without actually raising the terminal's volume.)
-
-
Setting Actions (Two Approaches):
Go to the
Actionstab at the top of the screen and tapAdd Actionat the bottom. An action list will appear; choose one of the following methods according to your purpose.-
【Method A】Linking to FRep2 Macro (Image Recognition Tap / Using Shortcuts)
Call the FRep2 macro you created in "6-2" via the physical button.
-
Select
Launch app shortcutfrom the action list. -
A shortcut list will appear; select the
FRep2 shortcut. -
The FRep2 configuration screen will open. Since the created macro is in the "Warehouse," change the list to
Warehouse (Hidden)and select the corresponding macro.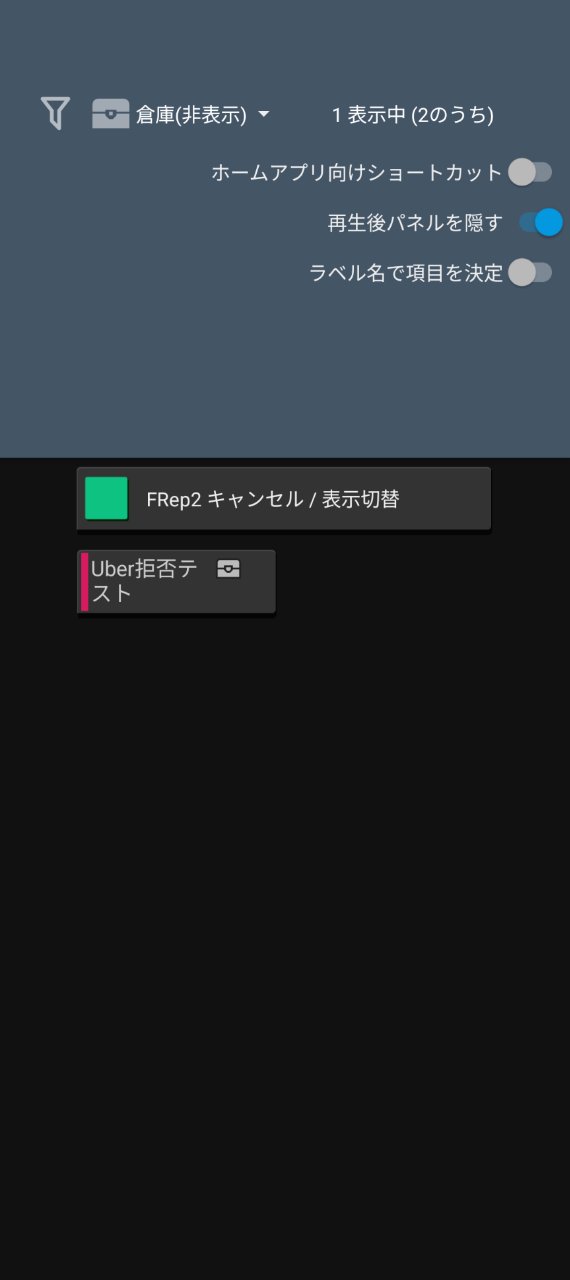
-
Select
Play from startfor the playback item.(※ This method works even without Shizuku, but response is faster with Shizuku enabled.)
-
-
【Method B】Using Shell command (ADB Hard Tap)
※ Here, we will proceed assuming an Uber Eats "Decline" action. For other purposes, refer to "6-5. Customization."
-
Select
Shell commandfrom the action list. -
Once the Shell command settings screen opens, first enter a title in the
Descriptionbox (e.g., Uber Decline). -
Next, copy and paste the following into the
Scriptbox.# 1. Get screen size size=$(wm size | awk '{print $NF}'); w=${size%x*}; h=${size#*x} x=$((w * 86 / 100)) # 2. Coordinate calculation (stored in variables as they are used multiple times) y1=$((h * 565 / 1000)) y2=$((h * 528 / 1000)) y3=$((h * 491 / 1000)) y4=$((h * 454 / 1000)) y5=$((h * 417 / 1000)) # 3. Execute "Non-moving swipe" (Press for 75ms = 0.075s) # By using swipe instead of tap and setting start/end points the same, it becomes a "long press tap" input swipe $x $y1 $x $y1 75; sleep 0.2 input swipe $x $y2 $x $y2 75; sleep 0.2 input swipe $x $y3 $x $y3 75; sleep 0.2 input swipe $x $y4 $x $y4 75; sleep 0.2 input swipe $x $y5 $x $y5 75 -
Change the
Execution Modeat the bottom toADB.(※ Important: ADB will not work if the link with Shizuku is not established. Also, apps like Uber Eats cannot be tapped in "Standard" mode.)
-
Once settings are done, tap
Donein the bottom right to save the Shell command. -
Return to the action settings screen, then press
Donein the bottom right again to save the action.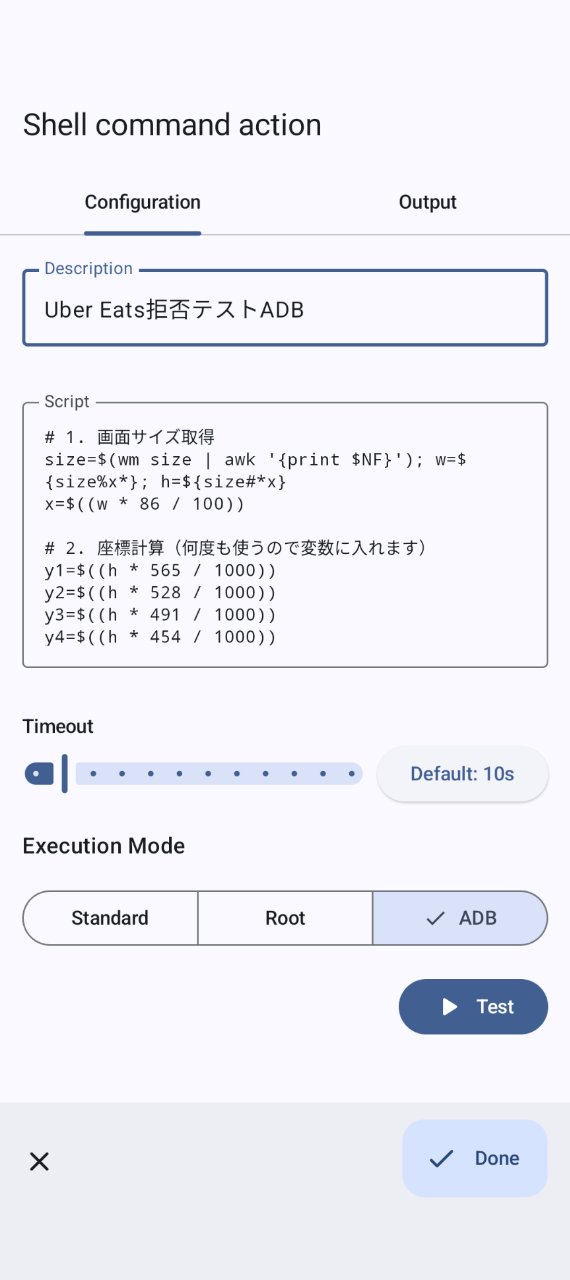
-
-
-
Canceling Volume Change (Super Important) and Saving:
Ensure that "Bypass" is checked (enabled) at the bottom of the rule setting screen or within Settings. This creates a state where "the actual device volume does not change when you press the trigger button." Once confirmed, tap
Donein the bottom right to save settings. -
Checking Key Mapper Startup (Important):
For Key Mapper to function correctly, both startup switches must be ON.
-
Individual Macro Startup: Is
Enabledin the top right of the saved macro list turned ON? -
Key Mapper Startup: Is
Running ↔️ Pausedat the top of the home screen set toRunning?If both are not ON, there will be no response when pressing the physical button.
-
Follow the same steps to create rules for "Button 2 (Volume Down)" and "Simultaneous Press (Play/Pause)."
6-5. Customization: Making it Your Own Ultimate Tool
Even if it's your first time, once you set it up this far, you probably have an idea of how the whole mechanism works. Here are some hints for customization based on your needs.
-
Changing Triggers and Actions: Try various things by changing the action list, such as setting a different button when configuring the "Trigger," or launching an application (e.g., Google Maps) when configuring the "Action."
-
Shell command Coordinate Adjustment: In Method B's code, X and Y coordinates are calculated as
% (percentage)of screen size. If you change the numbers, you can freely change the tap position, and because it is specified in %, it is easier to handle even if you switch devices. Direct pixel (px) specification is also possible. -
Processing Speed Advantage: Using Shell command to set coordinates and tap is clearly faster than using Key Mapper's standard X, Y coordinate tap function.
-
Regarding Offer Acceptance: Accepting an offer is possible by applying tap or swipe settings, but the risk of accidental acceptance is high, so this guide does not recommend it and omits examples. If you absolutely need to, please customize at your own risk.
-
Recommended Setting: Setting an action to "Return to Navigation App (Google Maps, etc.)" to a different button after accepting an offer while driving is highly recommended.
7. Operational Notes and Limitations (Waterproofing)
While this device is designed for use in harsh field environments, there are structural limitations.
It is not fully waterproof.
It is possible to improve the water resistance of the board mounting surface itself by applying a board-specific coating spray or nail polish. However, since the USB Type-C port for charging is exposed, the entire unit cannot be completely sealed.
When using in the rain, make it a strict prerequisite to install it inside the handlebar cover of your bike or operate it in a roof-covered environment. If water enters through the port, it will short-circuit and be destroyed in one go.
8. Original 3D Print STL Data (100 JPY)
The 3D printable STL data file for the case featured in this article is now available on BOOTH. This data is specifically designed to ensure the board and battery fit perfectly with millimeter-level precision.
If you have a 3D printer, please download the data and try printing it yourself.
【Notes before purchase】 This case is designed for the parts configuration specified in this guide (especially the Kailh Choc Brown and 1.8mm thick gel double-sided tape). Please note that if your construction environment is different, such as using different switches or tape of different thickness, the parts may not fit and it may not be usable.

9. Infinite Possibilities: To the Next Hack
This button was originally designed to process operations like "Accept" and "Decline" orders in food delivery in an instant, even in the rain, without looking at the screen. However, having obtained a generic "physical trigger," its range of applications is infinite.
-
Instant AI Calling: As a physical switch that instantly launches voice input mode or the API for ChatGPT, etc.
-
IoT/Smart Home Control: Linked with Tasker, etc., as a trigger to remotely operate specific home appliances or hit a Webhook.
-
Gaming: As a custom controller dedicated to a specific game, utilizing unique input lag counter-measures code.
Trial and error with soldering and coding on harsh rainy roads or at your desk in the middle of the night. I hope this small button completed at the end of that will solve the problems on your job site and become the seed for new "play."
Thank you for reading this gritty record to the end. If this information becomes a hint to change your environment or a spark for a new hack, it has served its purpose. Well then, I'll see you with the next idea.